December 4, 2020

Gingerbread Cinnamon Rolls

 Umm, yum. That describes these rolls, and they make the house smell fantastic. I saw these in Better Homes & Garden and made them within a week. This frosting definitely needs to top some type of gingerbread cupcake as well this holiday season. 


The only holdup in making these would be the mashed potatoes, which I imagine contribute greatly to the soft, supple texture. I'm not sure how to sub them, so I guess this is your excuse for mashed potatoes? Also, in full disclosure, I failed to read the recipe carefully and didn't divide my spices. I dumped everything into the dough and then added more seasonings to the filling. I think that hampered my rise a bit (particularly my second rise), so I'd suggest trying the recipe as written. 

I followed the recipe to make these into a star pattern, which required a bit more time and effort. The advantages of that are that it looks pretty cool and it's not quite clear how many cinnamon rolls you're eating. I'll include both sets of instruction below.

Gingerbread Cinnamon Rolls
3 3/4 to 41/4 cups flour, divided
4 tsp. ground ginger, divided
4 tsp. ground cinnamon, divided
1/2 tsp. ground cloves, divided
2 1/2 tsp. active dry yeast
3/4 cup milk
1 cup mashed potatoes
1/2 cup butter, divided
1 tsp. salt
1/3 cup molasses
2 eggs
1/2 cup brown sugar
Additional 1/4 cup butter
Frosting
3/4 cup butter
3 2/3 cup powdered sugar
1 tsp. ground ginger
1/2 tsp. ground cinnamon
Dash of ground cloves
2 Tbsp. milk
1 tsp. vanilla

In a large bowl, stir together 1 1/2 cups flour, 3 tsp. ginger, 1 tsp. cinnamon, 1/4 tsp. cloves and the yeast. In a saucepan, stir together milk, mashed potatoes, 1/3 cup butter, molasses and 1 tsp. salt until just warm (120 to 130°F). Add milk mixture and eggs to the flour. Mix until smooth. Add in 2 cups of flour, and stir in as much as you can. 

Turn dough onto floured surface. Knead in enough of the remaining flour to make a moderately smooth dough that isn't too sticky (about 5 minutes). Place dough into lightly greased bowl, cover and let rest until doubled (about 45 to 60 minutes). 

Punch down down. Let rest 10 minutes. Meanwhile, combine remaining spices, butter and brown sugar to make the cinnamon filling. Melt the remaining 1/4 cup butter separately. Set both aside. 

To shape rolls & bake rolls, lightly grease a 9 x 13 pan. Roll dough into 18 x 12 rectangle. Brush with melted butter, and sprinkle evenly with filling. Roll up tightly, starting from long side. Cut into 12 rolls, and place in pan. Cover, and let rise until nearly doubled (about 30 minutes).

To shape and bake star, divide dough into 8 equal portions after the 10-minute rest. Roll each dough into a 10-inch round. Prepare two baking sheets with parchment paper, as you will make two stars. For each star, place a dough round on the baking sheet. Brush with melted butter, and sprinkle with filling. Top with a second layer, and repeat the process. Top with a third layer and repeat the process. Top with a final layer, and brush only with melted butter. Gently press a 2 1/2-inch round cookie cutter in the middle. Cut 16 wedges, leaving the circle inside intact. Alternating directions, twist each wedge twice and pinch the ends to seal. Cover, and let rise until nearly doubled, about 30 minutes.

Preheat oven to 375°F. Bake rolls 25 to 30 minutes until golden and stars about 20 minutes. Let cool slightly before frosting.

To make frosting, melt butter over medium heat until it browns and smells nutty. Let it cool slightly, and then beat in sugar, spices and then milk and vanilla. Add more milk to reach desired consistency. Try not to eat off a spoon.

Makes 2 stars or 12 rolls. 

October 14, 2020

Hot Chocolate Bombs

 Living in a pandemic is stressful, and I came across the concept of hot chocolate bombs on a particularly stressful day. So I promptly ordered the molds from Amazon and a giant container of hot chocolate and created these as a form of stress relief. They are incredibly fun to use and quite tasty as well. 

Would I recommend investing in the equipment for these? That depends on whether you want a cool party trick, if you'd use the molds more than once, whether you plan to make them for gifts, etc. The answer for me was yes to all of these. I can envision a non-COVID world where I need teacher gifts and package these in a mug for all the teachers and aides that make our world go round (whom I desperately miss currently). 

I think I need to try a white chocolate version, and my son would appreciate a milk chocolate version. (I used a dark chocolate because that's my jam.)


Hot Chocolate Bombs

12 oz. high quality chocolate (can use milk, dark or white), chopped
6 Tbsp. hot cocoa mix (although I may double that in the future)
Miniature marshmallows (or other fun add-ins)

Temper the chocolate. If you've never done that before, I followed simple instructions to temper in the microwave by melting 3/4 of the chocolate, stirring every 10 seconds. Once that was melted, I stirred in the remaining chocolate and allowed it to melt. 

Use a spoon to spread chocolate into the molds. (I poured chocolate in each mold and used the back of a spoon to make sure the chocolate went up the sides.) Turn the molds upside down and shake out the excess chocolate. Place in the freezer 5 minutes. Attempt to remove bombs from molds. If they show signs of cracking, you can reinforce them with a bit more chocolate, just spreading it on with a spoon. Chill again to solidify. 

Carefully remove molds. Fill half of them with 1 Tbsp. of cocoa mix and mini marshmallows. Microwave a plate, so it is warm to the touch. Working carefully, take an unfilled chocolate shell and melt its edges on the plate. Stick it to one of the filled halves. Repeat the process to make all the bombs. You can also use a warm spoon to help smooth the lines where they connect. Makes 6 bombs. 

Full disclosure: Not every bomb melted and opened this cool. One broke because it wasn't sealed well enough, and another simply melted with a hole instead of the cool reveal. Still tasty and still fun. We were 2 out of 4 of the ones we tried. 

October 8, 2020

Peanut Butter Granola Bars

This recipe from Two Peas & Their Pod is a new favorite recipe for granola bars. I've adapted a bit from the original recipe. These are deliciously full of peanut butter, and I like the addition of chia seeds.

Peanut Butter Granola Bars
1/3 cup coconut oil
3/4 cup peanut butter
1/3 cup honey
1 tsp. vanilla
2 cups quick oats
1 cup regular oats 
1/2 cup coconut flakes
2 Tbsp. flax seed, ground
2 Tbsp. chia seeds
1/2 tsp. sea salt
1/3 cup mini chocolate chips

Melt coconut oil, peanut butter and honey together in the microwave, approximately 1 minute, longer if needed. Stir in vanilla. In large bowl, combine oats, coconut, flax, chia and salt. Add in the peanut butter mixture and stir well to combine. Stir in chocolate chips.

Press mixture into a lined 8 x 8 pan. Push firmly to help granola bars hold together. Chill at least a couple hours in the refrigerator before cutting. Stores well in the refrigerator for up to a week. 

August 8, 2020

Boozy Peach Jam

There's nothing quite like a fresh peach, but so often I end up with peaches that are woody or don't ripen beautifully. We invested in some beautiful peaches last month, but we ate them all before any could become jam. This recipe from Love & Olive Oil was intriguing enough that I text my husband and asked him to bring home 4 pounds of peaches. I knew we'd easily eat the extra pound because my son adores peaches. 

Boozy Peach Jam

3 lbs. ripe peaches
2 cups sugar, divided
6 Tbsp. lemon juice, divided
2 tsp. Pomona's Universal Pectin
1 1/2 tsp. calcium water
1/2 cup bourbon, divided

Bring a saucepan of water to a boil. Cut a shallow X on the bottom of each peach, blanch for 30 seconds and then submerge in an ice water bath. Once cool, peaches should peel easily. Cut in half, remove pits, and then chop the rest of peaches into roughly 1/2-inch pieces. You should have about 5 cups of chopped fruit.

Toss peaches with 3 Tbsp. lemon juice and 1 cup of sugar. Cover tightly and refrigerate for a few hours or overnight, stirring once or twice to keep the peaches coated with their own juices. 

Once peaches have macerated, prepare jars and supplies for canning. 

Combine remaining sugar and pectin, and set aside.

Bring to a simmer, and cook 10-15 minutes, mashing as it softens, to get to the desired consistency. Add remaining lemon juice, calcium water and 6 Tbsp. of bourbon. Bring to a full boil, stirring occasionally. Whisk in sugar/pectin, stirring continuously until mixture returns to a full boil. Stir in remaining 2 Tbsp. bourbon, and remove from heat. (If you prefer a kid-friendly jam, omit the last of the bourbon or add it all prior to boiling.) 

Ladle jam into prepared jars, leaving 1/4-inch headspace. Process in a hot water bath for 10 minutes. Cool completely, and refrigerate any unsealed jars. 

Depression Era Peanut Butter Bread

 This is the third peanut butter recipe in a row on my blog. Obviously, I love peanut butter, so this recipe from Sprinkle Bakes caught my attention. I saw it yesterday and was able to bake it today. It's definitely best served with a glass of milk, full of peanut butter flavor and delicious. 

Depression Era Peanut Butter Bread

2 cups flour
1/4 cup sugar
4 tsp. baking powder
1/2 tsp. salt
1 1/2 cups peanut butter
1/4 cup honey
1 1/3 cups milk

Preheat oven to 325°F. Combine flour, sugar, baking powder and salt together. Whisk to combine. In a separate bowl, stir together the peanut butter and honey. Add this mixture to the dry ingredients along with the milk. Mix using an electric mixer on low speed until just combined. Scrape down the bowl, and fold the batter until no streaks of flour remain.

Grease a 9 x 5 loaf pan. Scrape batter into the prepared pan, and smooth the top. Bake for 1 hour, until toothpick inserted near the center comes out clean. 

Let the bread cool 5 minutes in the pan, then turn out onto a wire rack to cool further. Slice using a serrated knife. Serve warm or cool. Makes 1 loaf.

June 14, 2020

Peanut Butter Icebox Torte

This recipe from Life Love & Sugar is phenomenal. My family loved it. My parents were lucky enough to snag pieces and loved it. In fact, my mom came back to watch my children just to eat another piece. OK, that's not quite true. She came back to help out during a childcare crunch, but at least she got another piece of this dessert in the process.

We're already contemplating a mint version ...


Peanut Butter Icebox Torte
12 oz. cream cheese, room temperature
255 grams powdered sugar, divided
2 Tbsp. milk
2 1/2 cups heavy whipping cream, chilled
1 tsp. vanilla
1/2 cup peanut butter
2 Tbsp. unsweetened cocoa powder
1/2 cup milk
2 15 or 16 oz. packages of peanut butter Oreos
Garnish
1/2 cup heavy whipping cream, chilled
2 Tbsp. powdered sugar
2 Tbsp. unsweetened cocoa powder
Remaining Oreos

Prepare a 9-inch springform pan by lining the sides with parchment paper sticking about an inch above the sides of the pan.

To make the mousse, beat the cream cheese and 155 grams powdered sugar together until smooth. Add the milk, and beat until smooth. Set the cream cheese mixture aside, and make the whipped cream.

To make the whipped cream, whip heavy cream on high until it begins to thicken. Add vanilla and remaining powdered sugar. Continue to whip on high until stiff peaks form.

Carefully fold 1/3 of the whipped cream into the mouse until combined. Fold in the remaining whipped cream. Then divide mousse mixture, putting 2/3 in one bowl and 1/3 in a separate bowl. Add the peanut butter to the 2/3 mousse, and fold until mixed. Add the cocoa to the remaining third, and fold until mixed.

Pour the milk into a shallow dish. Dip the Oreos in milk briefly, and place a layer of Oreos in the bottom of the pan. (I dipped 2 or 3 at a time, just to coat them. Don't let them sit or they'll get too soggy.) Spread with half the peanut butter mouse. Add another layer of milk-dipped Oreos. Top with the chocolate mousse. Add another layer of milk-dipped Oreos. Top with the remaining peanut butter mousse. Chill at least 4 or 5 hours.

To make the garnish, whip the heavy cream on high until it begins to thicken. Then add sugar and cocoa powder, and beat until stiff peaks form. Pipe chocolate whipped cream on the cake, and garnish with Oreos immediately prior to serving. Makes 14 to 16 servings.

May 21, 2020

Browned Butter Peanut Butter Snack Cake

This lady at buttermilk is a genius.

She combined peanut butter and browned butter. This cake is delicious, but this frosting is divine. Make this. Or make any cake you please, and top it with this frosting. (I couldn't make the peanut butter cheesecake I wanted for my birthday as it wouldn't hold up without a refrigerator for our trip to our land, so I made a simple chocolate cake and topped it with this.)


Browned Butter Peanut Butter Snack Cake
Cake
1/2 cup butter, to be browned
1/8 cup canola oil
1/3 cup peanut butter
1/3 cup sugar
2 tsp. vanilla
1/2 tsp. baking powder
1/4 tsp. salt
1/4 tsp. (heaped) baking soda
2 eggs, room temperature
1 cup cake flour
1/2 cup buttermilk
1 Tbsp. cocoa
1/2 Tbsp. milk
Frosting
1/2 cup butter, browned
1/4 cup butter, softened
1/3 cup peanut butter
1 tsp. vanilla
1/2 tsp. sea salt
2 1/4 cups powdered sugar
2 Tbsp. heavy cream (or milk)

Preheat oven to 350°F. Grease and line an 8 x 8 pan with parchment paper. Over medium heat, melt the butter. Cook until butter is browned and nutty. (You can brown the butter needed for the frosting at the same time, and set half aside. Just make sure to get the browned bits in both the cake and frosting portions as those contain the most flavor.)

Pour browned butter into a bowl. Add peanut butter, vanilla, sugar and oil. Whisk together until smooth. Whisk in the eggs. Gently stir in the dry ingredients. Add the buttermilk, and stir until smooth. Pour half the batter into the pan. Add the cocoa powder and milk to the remaining half of the batter, and stir until smooth. Dollop the chocolate batter throughout the pan, and gently swirl with a knife. Bake 20 to 30 minutes or until cake is done.

To make the frosting, chill the browned butter until it's solid but not fully hardened. Using a mixer, beat together the butters until fluffy. Add in peanut butter, vanilla and salt, and beat to combine. Gradually add the powdered sugar, and mix until incorporated. Drizzle in the cream or milk, and beat on high until fluffy. (You can add more milk if needed to achieve the desired texture.)

Spread frosting on cooled cake. Enjoy. Makes an 8 x 8 cake.

May 14, 2020

Flourless Chocolate Cake

This is a simple recipe with simple ingredients, yet it tastes incredibly decadent. Perhaps that's because you're eating chocolate, eggs, butter and little else. You could even pretend it's healthy because there's no added sugar. It's not. (It's not healthy. There is also no added sugar.)

This came across my radar from Brown Eyed Baker. I've always enjoyed her recipes and found this to be a solid win. Mine required additional baking time to set, but it was absolutely worth it. The perfect treat for Mother's Day!

Flourless Chocolate Cake
8 eggs, cold
16 oz. bittersweet chocolate (chopped)
1 cup unsalted butter (cut into small cubes)
1/4 cup brewed coffee at room temperature (or water)
1/4 tsp. salt
1 tsp. vanilla extract
1/2 tsp. chocolate extract (helpful if you have no coffee)

Preheat oven to 325°F. Grease an 8-inch springform pan, line with parchment & grease the parchment. Wrap the outside of the pan in a double layer of aluminum foil, and place in a 9 x 13 pan (or other larger dish to use for a water bath). Put a small pot of water on to boil for a water bath.

Using a stand mixer with a whisk, beat eggs on medium until doubled in volume, about 5 minutes. Meanwhile, melt chocolate and butter together with coffee using a double boiler. (I cheated and melted the chocolate and butter on medium heat in the microwave and stirred in the water.) Remove from heat, and stir in chocolate and extracts.

Using a large spatula, fold one-third of the eggs into the chocolate mixture until just a few streaks of egg are visible. Add the remaining eggs in two more additions, folding until the mixture is totally combined.

Transfer the batter to the prepared pan and smooth out the top. Pour enough boiling water to come halfway up the springform pan. Bake until the cake has risen slightly, the edges are beginning to set and a thin glaze (like a brownie crust) has formed, about 22 to 25 minutes. The cake should register 140 degrees on a digital thermometer.

Remove the cake from the water bath, remove foil, and set on a wire rack to cool completely. Once cool, cover with plastic wrap, and chill at least 6 hours or overnight before serving. (The cake keeps well refrigerated for up to 4 days.)

About 30 minutes before serving, run a thin knife between the cake and pan, and remove the sides of the pan. Place the cake on a serving platter, dust with powdered sugar if desired and serve with fresh whipped cream. Serves 12 to 16.

Sourdough Discard Crackers

I saw quite a few people trying sourdough discard crackers, so I jumped on the bandwagon using a recipe from Little Spoon Farm. I tweaked it slightly because I thought everything bagel crackers sounded good. Well, from the one I tried, they are quite good. So good that my husband ate the remainder of the 3 batches I made!

These are easy and required simple ingredients I had on hand. You can season them with herbs, hard cheeses, etc. to suit your preferences and what's available.

Sourdough Discard Crackers
200 g. sourdough starter
1 1/2 Tbsp. butter, melted
1 1/2 tsp. everything bagel seasoning

Preheat oven to 325°F. In a bowl, combine discard, butter and seasoning. (You can use all the seasoning at once or reserve 1/3 to sprinkle on top. Tastes the same, but the seasoning on top enhances the appearance.)

Spread in a thin layer on a sheet of parchment paper. Bake 10 minutes, remove from the oven and score into cracker shapes using a knife or pizza cutter. Return to the oven, baking a total of 40 to 50 minutes or until crunchy. I usually end up removing the crackers that are done and letting the rest bake a few more minutes as mine are never baked perfectly evenly.

Makes apparently 1 serving of crackers, although I think it's supposed to probably be at least 4 servings.

May 11, 2020

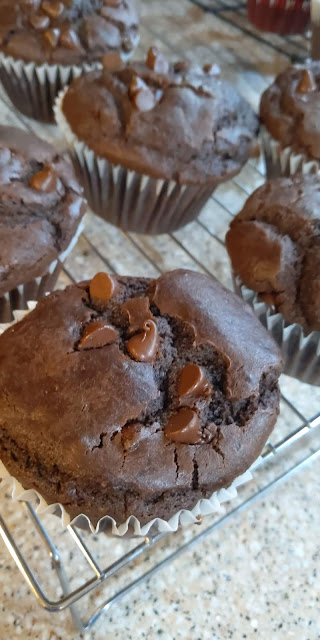
Double Chocolate Muffins

Baking is one of my happy places, so I gave these muffins from Two Peas & Their Pod a whirl to have tasty treats for a day trip to our land. Both my husband and son agreed these are better than the store-bought versions that we all thoroughly enjoy. My one son chanted "best muffins ever," and my other son smeared chocolate muffin everywhere to show his appreciation.

These are worth making. I did a double batch because I wanted leftovers. I ended up with 12 jumbo muffins and 8 regular muffins, so I'm not complaining that my version ended up with more than the original recipe.


Double Chocolate Muffins
1 2/3 cup flour
3/4 cup cocoa powder, divided
2 tsp. baking powder
1/2 tsp. baking soda
1 tsp. salt
1/2 cup hot water
1/3 cup vegetable oil
2 eggs, plus 1 yolk
2 tsp. vanilla
3/4 cup sour cream
2 1/2 cups chocolate chips

Preheat oven to 375°F. Line 12 standard-size muffin tins or 6 jumbo ones with paper liners. In a bowl, whisk together flour, 1/4 cup cocoa, baking powder, baking soda and salt. In a separate bowl, whisk together the remaining 1/2 cup cocoa powder and hot water until smooth.

In a third bowl, beat the sugar, oil, eggs and yolk, vanilla and sour cream together until well combined. Add 1/3 of the flour mixture, then 1/2 the cocoa and water mixture, another 1/3 of the flour, the remainder of the cocoa and water mixture and then the final 1/3 of the flour. Stir to combine after each addition. Stir in 2 cups of chocolate chips, reserving the remainder.

Divide batter evenly among muffin tins, using more as needed to ensure each is filled no more than level. (Mine were between 3/4 full and level and turned out great.) Top with remaining chocolate chips for that bakery look.

Bake 25-30 minutes for standard muffins or 40 for jumbo. Transfer to a wire rack to cool slightly before removing from the tin to cool completely (or devour warm). Be sure to check at about 20 minutes or 30 minutes for jumbo to avoid dry muffins by over-baking them.

Notes: With doubling the recipe, I used 5 eggs with no issues instead of the extra egg yolk. Also, I skimped and only used 4 cups of chocolate chips, and they was still plenty of chocolate.

April 26, 2020

Mini Pancake Muffins

These muffins taste pretty much like pancakes, complete with chocolate chips and maple syrup. We're usually a pancake family on the weekends, so this recipe from Bakerella caught my eye. I ended up baking a batch in the afternoon for snack and easy freezer breakfasts and another batch the next morning. These come together so quickly that even my impatient children can (mostly) manage the wait.

Mini Pancake Muffins
1 cup flour
1 tsp. baking powder
1/2 tsp. baking soda
1/4 tsp. salt
2 Tbsp. sugar
2/3 cup buttermilk
1 egg
2 Tbsp. maple syrup
2 Tbsp. melted butter
1/2 cup mini chocolate chips

Preheat oven to 350°F, and spray a 24-count mini muffin pan with non-stick spray.

Combine dry ingredients together in a medium bowl. In another bowl, stir together buttermilk, egg, maple syrup and butter until combined. Add wet ingredients to the dry, and stir until combined. Stir in chocolate chips.

Divide evenly into muffin pan, and bake 8-10 minutes. Let cool slightly and remove from the pan. Serve immediately. Makes 24 mini muffins.

April 19, 2020

Sourdough Biscuits


My husband and son adore biscuits and gravy. I thought I found my favorite biscuit recipe until I found this one from King Arthur Flour that used sourdough starter. Now I need to feed my starter extra to have enough discard to make a double batch of biscuits since one isn't enough for our family of four (when they're biscuit monsters).

These biscuits have layers, are soft and tender on the inside and develop a fantastic crunch on the bottom. Plus, they are perfectly buttery. These are now, hands down, our favorite biscuits. I made a few adaptations to the original recipe, which are reflected below.

Sourdough Biscuits
1 cup (120 grams) all-purpose flour
2 tsp. baking powder
3/4 tsp. salt
6 Tbsp. cold, unsalted butter
1 cup (227 grams) sourdough starter, unfed/discard

Preheat oven to 425°F. Combine the flour, baking powder and salt. Grate the butter into the dry ingredients. (I use a spatula to clean the butter off the grater, so I don't warm it up with my hands.) Work the butter into the flour mixture until the mixture is unevenly crumbly.

Add the starter, mixing gently until the dough comes together. Turn the dough onto a lightly floured surface. Gently pat the dough, and then fold it in half. Pat it down, and fold it in half again. Repeat another time or two to create layers. Pat the dough into a rectangle about 6 x 4. Cut into 6 biscuits, and place on a baking sheet.

Bake for 20 to 23 minutes or until golden. Serve warm, either with gravy or honey and butter ... at least in our house. s

April 4, 2020

Sourdough Cinnamon Rolls

I attempted sourdough bread once in my life prior to the COVID-19 pandemic. It was an epic fail. As in my dad attempted to use a table saw from the woodworking shop to cut it. Whoops.

But someone offered to mail me dehydrated sourdough starter, and we're spending much more time at home. So despite spending much more time working, I'm able to work on sourdough projects that require a lot of time but not hands-on and not all at once. Thus far I've baked bread, pizza crust, cinnamon rolls, biscuits and I have a double batch of bread and English muffins chilling in the fridge to bake tomorrow. (Fun fact: English muffins are "baked" on a griddle, not the oven.)

These cinnamon rolls from The Clever Carrot are delicious. I made a double batch, which was no less work, so I was able to share with three different families and still have plenty for our family. That's good because both boys devoured their first and wanted seconds. Me? I ate two and was still so full that I didn't need lunch. Apparently they're delicious and satisfying.

During my final proof, I used my oven, which was a touch warm and melted some of the butter, cinnamon and sugar down to the bottom of the pans. It wasn't the end of the world as it essentially made them cinnamon rolls with a touch of caramel roll on the bottom.

Note: A scale is extremely helpful for these sourdough recipes.


Sourdough Cinnamon Rolls
160 g. (2/3 cup) milk
56 g. (4 Tbsp.) butter, divided
1 egg
100 g. (1/2 cup) active sourdough starter
24 g. (2 Tbsp.) sugar
300 g. (2 1/2 cups) all-purpose flour
3 g. (1/2 tsp.) salt
Cooking spray
Filling
1/2 cup sugar
3 tsp. cinnamon
Glaze
2 Tbsp. butter, softened
1/2 cup whipped cream cheese, room temperature
1/2 cup powdered sugar
1-2 Tbsp. milk

Warm milk and 2 Tbsp. butter in a shallow pan or microwave, and cool slightly before using. Add the egg, starter and sugar to the bowl of a stand mixer. Mix to combine, and then slowly add the warm milk mixture. Add flour and salt, and continue mixing until a rough dough forms. Cover with a damp towel, and let rest for 30 minutes. After the dough has rested, switch to the dough hook and knead for 6 to 8 minutes until dough comes together. Place dough in a greased bowl, and cover. Let rest for 30 minutes. Repeat this 4 times, turning the bowl as you go. This aerates the dough and makes it feel soft and supple. Cover again, and let rise 8 to 12 hours or until doubled.

The next morning, lightly oil and flour your counter to prevent sticking. Gently coax the dough out of the bowl. Stretch and fold the edges toward the center to deflate some of the air. Using floured fingers, flip the dough over and let it rest 15 minutes. Line a 9-inch pan with parchment or grease it well. Lightly dust the surface of your dough with flour and rolling pin. Roll the dough into a 16 x 12 rectangle. If dough doesn't roll out well, let it relax another 10 minutes and try again.

Melt remaining 2 Tbsp. butter in a shallow pan or microwave. Combine cinnamon and sugar in separate small bowl, and set aside. Brush dough with butter, all the way to the edges. Sprinkle the cinnamon mixture evenly, leaving a half-inch border around the edges.

Gently roll the dough, working on the long side of the dough, into a tight roll. Cut into 8 even pieces. Place in the pan, and let rest 1 to 2 hours or until puffy. (You can let the dough rise one hour, and then chill covered overnight.)

To bake the rolls, allow them to come to room temperature. Preheat your oven to 350°F. Place the dough on the center rack, and bake 40 to 45 minutes. Cool for 15 minutes, and then make the glaze while they're cooling by beating together all the ingredients. Glaze the rolls, and enjoy while still warm. Makes 8 rolls.

March 9, 2020

Pretzel Focaccia

I swear, there's nothing quite like homemade bread. There's something about the process of making it as much as the the devouring of it that is comforting. Perhaps it's just the ability to create something so delicious with relatively minimal effort for a bread like this from How Sweet Eats.

I made this bread within a week of seeing the recipe posted. It's delicious straight from the oven, still warm with chewy crust. It definitely diminishes in quality the following day, although I think a quick pop in the oven (or using it for grilled cheese) would likely give it new life.

Now I really want to make this honey oatmeal bread again ... it was the first bread I remember baking.


Pretzel Focaccia
6 cups all-purpose flour
1 Tbsp. salt
1 packet (2 1/4 tsp.) active dry yeast
3 cups warm water
6 Tbsp. melted butter (I used about 4)
2 Tbsp. canola oil
2 Tbsp. baking soda
1/2 cup boiling water
Flaky sea salt, for topping
Sesame seeds, for topping

Stir together the flour, salt and yeast in a large bowl. Slowly add in the warm water while stirring constantly until a sticky dough forms. Once the lumps are gone, cover it, and place in a warm spot to rise for 1 to 2 hours, until doubled.

Brush an 18 x 13 pan with 2 Tbsp. of the melted butter. Drizzle on the oil, and spread evenly around the pan. Turn the dough out onto the pan, and press it out with oiled hands until it covers the pan completely.

Place the baking soda in a large bowl, and add the boiling water. (It will bubble, hence the larger bowl.) Brush the mixture on top of the dough, reserving some for later. Then place the pan in a warm place, and let it rise again for an hour.

Meanwhile, preheat the oven to 475°F. Brush the dough again with the baking soda mixture. Bake for 10 minutes. Remove the pan, and brush the dough with the remaining melted butter. Sprinkle with salt and sesame seeds. Bake another 10 to 15 minutes until the top is golden and edges are a bit crisp. Let the bread cool slightly before slicing it. Makes 1 large focaccia loaf.

March 5, 2020

Italian Bread

I truly love baking. Some breads require so many steps and so much futzing that they don't often get made, but this Italian bread from Brown Eyed Baker is extremely simple to throw together and takes less time than many other loaves.

Italian Bread
2 cups lukewarm water, about 110°F
2 1/4 tsp. active dry yeast
5 cups bread flour
1 Tbsp. brown sugar
2 Tbsp. olive oil
2 1/2 tsp. salt
Optional Topping
1 egg white, lightly beaten
2 Tbsp. sesame seeds

Mix yeast into 1/2 cup water. Set aside for 5 minutes to activate the yeast. Meanwhile, combine the flour, sugar, oil and salt in the bowl of an electric mixer. Add in the yeast mixture and remaining water. Mix on the lowest setting using the dough hook, using up to 3/4 additional cup of flour if needed, for 7 minutes. Dough should be lightly sticky and smooth. Transfer to a lightly floured surface, and need by hand 1 to 2 minutes until a smooth, firm, elastic dough is formed.

Transfer the dough to an oiled container or bowl. Cover with a lid or plastic wrap. Let rise 1 1/2 hours until doubled. Meanwhile, preheat the oven to 425°F. If you have a baking stone, preheat that in the oven as well. If you don't, use the inverted baking sheet in the next step.

Shape the dough into an oven loaf with lightly floured hands. Place the dough on a bakers peel heavily dusted with flour (or an inverted baking sheet). Allow the dough to proof, covered loosely with a floured dish towel, for 30 minutes or until doubled in size.

If using the topping, brush the dough with the egg white, and sprinkle with sesame seeds. Use a razor blade or sharp knife to slash the dough lengthwise about 1/4-inch deep, keeping the blade at a 45° angle.

Just prior to placing the bread in the oven, pour 1 cup of water into a metal pan on the bottom rack of the oven. Carefully transfer the loaf from the peel to a baking stone in the oven.  If you don't have a baking stone, just place the inverted cookie sheet into the oven with the bread on it.

Bake until golden brown and bread is at least 195° internally. It should sound hollow when you tap the bottom of the bread. This will take 30 to 40 minutes. Allow the bread to cool (at least mostly) before slicing. Makes 1 large loaf.

Cauliflower Risotto

If it weren't Lent, with the need to avoid meat on Fridays, I'm not certain I would have tried this cauliflower risotto recipe from How Sweet Eats. I'm so glad I did because it was a perfect meal for me to enjoy with a glass of wine left over from the recipe. I'm also glad I enjoyed it as much as I did because the rest of my family turned up their noses. In fact, AJ walked into the house after school, gagged and asked what that smell was.

This reheats wonderfully for lunches and feels at least a bit healthy because of all the cauliflower. I adapted the recipe slightly, knowing that the Brie in the original recipe wouldn't fly with my family. This is worth repeating, Lent or not.

Cauliflower Risotto
4 Tbsp. unsalted butter
1 sweet onion, minced
2 garlic cloves, minced
Pinch of salt and pepper
1 head cauliflower, chopped into small florets
1 1/2 cups arborio rice
1 Tbsp. fresh rosemary or 1/2 Tbsp. dried rosemary
4 cups vegetable stock
1/2 cup dry white wine
1 cup hot water
1 cup grated Parmesan cheese

Preheat the oven to 350­°F. Heat a large dutch oven over medium-low heat. Melt the butter, and add the onions. Cook 5 minutes or until translucent. Add the garlic, and cook 2 more minutes. Add the cauliflower, and cook until the florets are golden and toasty, about 8 minutes. Stir in the rice and rosemary. Cook 1 to 2 minutes until the rice is translucent. Add in the stock, wine, salt and pepper. Stir to combine.

Place in the oven, and cook 35 to 40 minutes, until the liquid is absorbed. If the rice is too chewy, add another 1/2 cup of liquid and cook another 10 minutes or so. Remove from the oven, stir in the hot water and the cheese. Sprinkle with extra cheese, and serve, preferably with a glass of the leftover wine. Makes 4 to 6 servings as an entree.

January 28, 2020

Our New Favorite Granola

I've made homemade granola for years, finding quite a few varieties that we enjoy. I wanted to try something different and tried a recipe from Gimme Some Oven with a few variations. Dave has been devouring this by the handful, as well as topping vanilla yogurt for dessert. It's solid for breakfast, snacks or dessert. It's not overly sweet or spiced, just right, as long as you don't mind picking chia seeds out of your teeth.

We're on our second batch in two weeks, and I'm still not sure it'll last long enough to photograph it in the light of day.

Granola
4 cups whole oats
1 cup salted pecan pieces
2/3 cup unsweetened coconut flakes
1/4 cup chia seeds
1/2 tsp. cardamom
1/4 tsp. salt
1/2 cup coconut oil, melted
1/3 cup maple syrup
2 tsp. vanilla
1/2 cup dark chocolate chips

Preheat oven to 350°F. Combine dry ingredients through salt together. Melt coconut oil, and combine with maple syrup and vanilla. Stir into oat mixture until thoroughly coated. Spread evenly on a lined baking sheet.

Bake 20 minutes. Stir, and bake another 5 minutes. Remove from oven, and sprinkle with chocolate chips. Let them melt into the granola, and then cool completely. Store in an airtight container. Makes approximately 6-7 cups.